A practical step-by-step workflow for planning, building, validating, and shipping VAST campaigns.

Article contents
- How to Create Video Ads: A Practical Guide to Building VAST Tags Faster
- Why video ad creation feels harder than it should
- Step 1: Define campaign goals before writing XML
- Step 2: Choose the right VAST format
- Step 3: Prepare media assets for playback reliability
- Step 4: Build your VAST tag structure
- Step 5: Add tracking and click-throughs correctly
- Step 6: Validate and test before launch
- Step 7: Share, reuse, and iterate faster
- Common mistakes to avoid
- How the AdMeIn VAST Generator helps at each stage
- Final checklist before going live
- Related resources
How to Create Video Ads: A Practical Guide to Building VAST Tags Faster
Creating video ads is not just about exporting a MP4 and dropping it into an ad server. To run video campaigns reliably across web, mobile, and CTV, you need a valid VAST tag structure, compatible media files, accurate tracking URLs, and a repeatable QA process.
If that sounds like a lot, you are not alone. Many teams lose hours debugging wrappers, fixing invalid XML, or chasing playback errors that started with a small trafficking mismatch.
This guide walks through a practical workflow for producing VAST tags, from planning to launch, and explains where the AdMeIn VAST Generator helps you move faster with fewer errors.
Why video ad creation feels harder than it should
Video ad delivery has more moving parts than display ads:
- XML structure must be valid and player-compatible.
- Media files must match codec, bitrate, and duration expectations.
- Tracking and click URLs need to fire correctly across environments.
- Wrappers and partner redirects can introduce latency and failure points.
When any one part breaks, campaigns can fail silently or under-deliver.
The fix is to use a clear build process and a toolset that reduces manual XML editing.
Step 1: Define campaign goals before writing XML
Jumping straight into building a VAST tag is one of the most common mistakes in video ad operations. While it might feel faster to start with a template, doing so without clearly defined campaign requirements often leads to rework later - especially when tags need to be adapted for different placements, devices, or measurement frameworks.
At this stage, you are not thinking about XML yet. You are defining the intent of the campaign and the environments it needs to succeed in. These decisions directly influence everything that follows, from format selection to tracking implementation.
Before writing any tag, align on:
- Placement type: pre-roll, mid-roll, post-roll, or ad pod.
- Format needs: linear only, companion ads, interactive behavior.
- Device targets: web, app, CTV, or mixed inventory.
- Measurement goals: quartiles, completes, clicks, viewability, verification.
Step 2: Choose the right VAST format
Once your campaign goals are clear, the next step is selecting the correct VAST structure to support them. This decision is more important than it seems - starting with the wrong format can create unnecessary complexity, especially when wrappers, companions, or multi-ad scheduling are introduced later.
Different formats are designed for different delivery scenarios. Choosing the right one upfront reduces the need for restructuring your tag mid-build and helps ensure compatibility with the intended playback environment.
Pick the starting format based on your use case:
- Standard linear VAST for most in-stream video buys.
- Wrapper VAST when mediation or partner handoff is required.
- VMAP or podded formats for multi-break scheduling.
- Companion-enabled VAST when you need side placements or end cards.
Starting with the correct structure saves significant rework later.
Step 3: Prepare media assets for playback reliability
Even a perfectly structured VAST tag will fail if the underlying media assets are not compatible with the player environment. In practice, many playback issues are not caused by XML errors, but by media files that are too large, incorrectly encoded, or inaccessible at runtime.
This step is about ensuring that your creative assets are as robust and flexible as your tag structure. A small amount of preparation here can prevent major delivery issues later, especially across varied environments like mobile networks or CTV devices.
Ensure your creative files are ready:
- Include broadly supported MP4 variants (H.264/AAC baseline).
- Keep file size and bitrate reasonable for target environments.
- Host assets on stable HTTPS endpoints.
- Verify CDN performance and URL accessibility.
For broad compatibility, include at least one conservative media variant alongside higher-quality renditions.
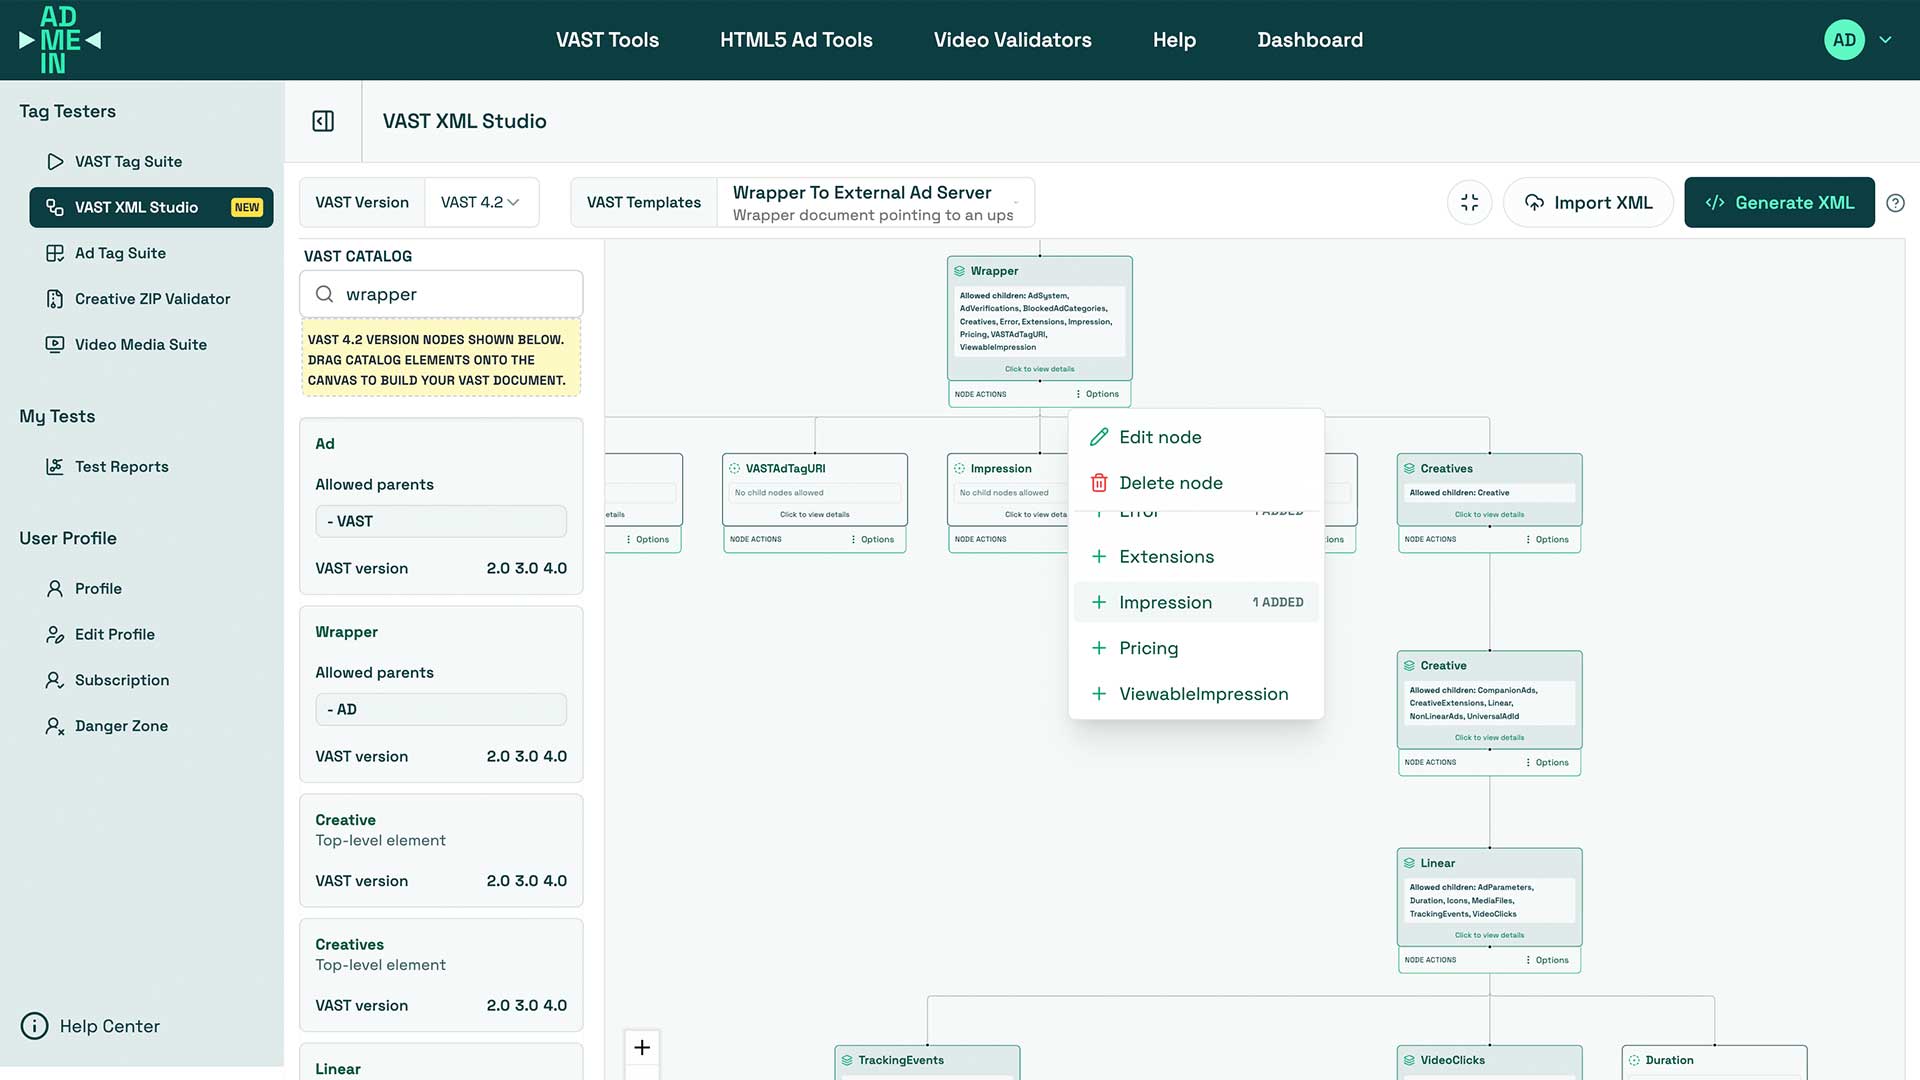
Step 4: Build your VAST tag structure
With planning and assets in place, you can now begin constructing the VAST tag itself. This is where all previous decisions come together - campaign goals, format selection, and media preparation all inform how the XML should be structured.
While VAST is a standardized format, it is also unforgiving. Small syntax issues, missing nodes, or incorrect hierarchy can break playback entirely. That is why having a clear understanding of required elements - or using a tool that enforces them - is critical at this stage.
At this stage, define the required nodes and metadata:
<AdSystem>,<AdTitle>, and<Impression><Creatives>with a correct<Linear>or relevant format<Duration>and<MediaFiles>entries- Optional nodes such as
<CompanionAds>,<AdVerifications>, or wrappers
Manual editing can work, but it is easy to introduce tiny syntax errors that break downstream delivery. A visual builder helps prevent this by enforcing structure and reducing copy-paste drift.
Step 5: Add tracking and click-throughs correctly
Tracking is one of the most sensitive parts of any VAST implementation. Unlike structural issues, which often result in obvious playback failures, tracking problems can go unnoticed while silently impacting reporting, attribution, and campaign performance.
This step requires careful attention to detail. Every URL must be correctly formatted, reachable, and mapped to the appropriate event. Inconsistent tracking setups are a common source of discrepancies between platforms.
Confirm the following:
- Impression tracking URLs are present and accessible.
- Quartile tracking events are mapped correctly.
- Error tracking endpoint is configured.
- ClickThrough and click trackers are valid and URL-safe.
When possible, standardize these fields in reusable templates so campaign setup is consistent.
Step 6: Validate and test before launch
Before a VAST tag is trafficked into a live campaign, it should go through a structured validation process. Skipping this step is one of the fastest ways to introduce avoidable issues into production - especially when working with wrappers, third-party tracking, or multiple environments.
Validation is not just about checking if the XML is “correct.” It is about confirming that the entire delivery chain works as expected, from tag response through to playback and tracking execution.
Always validate your tag before trafficking:
- Validate XML formatting and required nodes.
- Test wrapper resolution and redirect depth.
- Confirm media playback in real player environments.
- Review tracking fires and error handling.
A pre-launch test pass is one of the highest-leverage steps in video ad operations.
Step 7: Share, reuse, and iterate faster
Once a VAST tag has been successfully built and validated, it becomes a valuable asset - not just for the current campaign, but for future ones as well. High-performing ad ops teams treat VAST creation as a repeatable system, not a one-off task.
By standardizing templates and workflows, you can significantly reduce setup time, minimize errors, and improve consistency across campaigns. Over time, this approach compounds into faster launches and more reliable delivery.
Create a repeatable flow:
- Save known-good templates for common campaign types.
- Share deep links to template starting points with internal teams.
- Clone and adapt instead of manually rewriting XML each time.
- Keep a validation checklist attached to handoff docs.
This improves throughput and lowers production risk over time.
Common mistakes to avoid
Even with a solid workflow in place, there are a handful of recurring issues that continue to impact video ad delivery. These mistakes often stem from small oversights but can have outsized effects on performance, tracking accuracy, or playback reliability.
Being aware of these pitfalls - and actively designing your workflow to avoid them - is key to maintaining consistent campaign quality.
Watch out for the following:
- Starting from the wrong VAST format for the placement.
- Using media files that do not match player capabilities.
- Missing or malformed tracking URLs.
- Excessive wrapper depth causing timeouts.
- Launching without environment-specific testing.
Avoiding these mistakes usually comes down to better defaults and faster validation loops.
How the AdMeIn VAST Generator helps at each stage
Managing all of these steps manually can quickly become time-consuming, especially when dealing with multiple campaigns, partners, and variations of VAST tags. This is where tooling becomes essential - not just to speed things up, but to reduce the likelihood of human error.
The AdMeIn VAST Generator is designed to support each stage of the workflow, from initial creation through to validation and iteration. Instead of working directly in raw XML, it provides a structured environment that guides you toward compliant, production-ready tags.
Here is how it helps:
- Start from pre-built templates instead of blank XML.
- Build tags visually and export compliant XML quickly.
- Import existing tags to inspect, edit, and improve them.
- Pair with validation workflows to catch issues before launch.
- Use shareable routes and template links for internal collaboration.
If you are creating multiple video campaigns per month, this workflow can significantly reduce setup time and QA churn.
Try it here: AdMeIn VAST Generator Studio
Final checklist before going live
Before launching a campaign, it is worth running through a final verification step to ensure nothing has been missed. Even small issues - like a broken tracking URL or an inaccessible media file - can impact performance once the campaign is live.
A simple checklist helps standardize this final review process and reduces the risk of last-minute surprises.
Use this quick launch checklist:
- Goal and placement requirements confirmed.
- Correct VAST structure selected.
- Media files tested and reachable via HTTPS.
- Tracking and click-through URLs validated.
- Wrapper behavior verified (if used).
- End-to-end playback tested in target environments.
- Final tag shared with clear version notes.
A disciplined VAST workflow turns video ad creation from a fragile manual task into a reliable production process.
Related resources
Quick Test Tools
VAST Tag Tester
Validate VAST XML, wrapper chains, and media playback.
VAST Generator
Build compliant VAST XML visually using templates.
VAST Templates
Start from a direct template route for faster internal handoff. Or choose from our many VAST XML templates.